Finish Tuesday assignment from last week.

Monday assignment
Finish Tuesday assignment and be ready to turn it in.
- Posted using BlogPress from my iPhone
- Posted using BlogPress from my iPhone
District Art Contest

- New Braunfels ISD is seeking artwork for the 2010 Holiday Card Art Contest. This contest is open to all NBISD students.
- The theme is “The Perfect Holiday.”
- The deadline to submit entries is Monday, November 8, 2010. Please mail
- original artwork to:
- NBISD
- Attn: Stephanie Ferguson
- 430 W. Mill St.
- New Braunfels, Texas 78130
- The winner will be recognized at the December Board of Trustees meeting. The winning artwork will appear on the 2010 NBISD Holiday Card.
- Last year's winner was New Braunfels High School Senior Casey Heidrich....
- Any type of artwork will be accepted. Art may be pen, pencil, water color, crayon, charcoal, or marker. Artwork should be created on a white 8.5 x 11-inch sheet of paper – landscape (horizontal) only. No medium should be applied to the artwork like glitter or other items adhered to the page.
- Artwork will be judged on originality, creativity, and artistic ability.
- For more information, contact Stephanie Ferguson at 830-643-5700 or email at
sferguson@newbraunfels.txed.net.
Stephanie Ferguson
New Braunfels ISD
Public Information Officer
430 W. Mill St.
New Braunfels, Texas 78130
830-643-5720 (office)
830-708-7451 (cell)
photo gift ideas
http://www.skymall.com/shopping/detail.htm?pid=203100590
http://www.skymall.com/shopping/detail.htm?pid=203495724
Photocard Class Favorites
If you haven't done so yet, check out the Photocards that were voted "Class Favorites," as well as the cards I personally enjoyed: Gallery
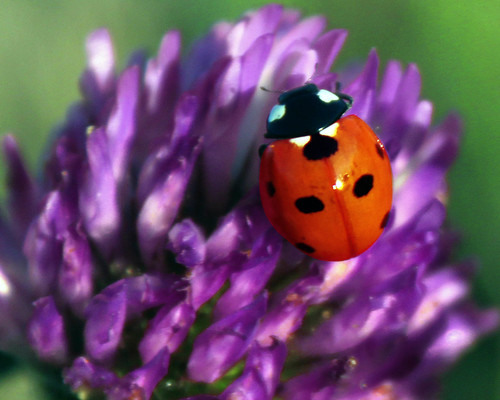
Image of the Week

Maybe it will be a new tradition, maybe not. But I couldn't resist posting this image by Jacob T., third period.
Need help with an assignment or clarifying project instructions?

I'll keep an eye on my blog while I'm gone. Just post your questions. Or email me at my school email address.
2G flash drive for $5!
If you still haven't purchased a flash drive, here is a great deal (with free shipping!):
Photoshop Celebrates 20 Years!

Take a look at some of the cool features that have been added over the years:
Free Music?

Stealing music is a big no-no, but there are places on the web where you can actually get it free-legally. You might not be able to get to all of them from school, but they're out there. Here are a few I know of. Web students can download a small collection (no more than 25) so they'll have choice when it comes to creating their video project.
www.amazon.com/mp3
Look in the Browse MP3s sidebar for Free Songs & Special Deals
www.last.fm
www.insound.com
www.amclassical.com
www.archive.org/details/etree
Free live concert recordings. Look for a link the the Browsing and Finding Shows section for "Browse artists with MP3s"
iTune Store:
At the bottom of the main iTunes Store page: look for a link called "Free on iTunes"
Find podcasts from your favorite bands--the podcasts are free and sometimes you'll get to hear a song in progress or even a jam session.
Viewing photos on iPhone or iPod

"Here's a problem you've probably encountered while trying to show someone else a picture in the iPhone's Photos app. As you pass the phone around, the accelerometer keeps flipping the image from portrait to landscape to upside-down landscape and back again. Annoying, right?
As it turns out, there's an easy way to fix this (at least on iPhone 3.1.2, which I'm running): just tap and hold on the image for a second or two and the phone will lock it into position. This might cause a "Copy" bubble to pop up, but it will disappear after a moment, and the image will retained locked, no matter which way you flip the phone. To unlock it, just tap the image again and you're done.
There are some exceptions. While the hint works if you're zoomed in on an image in portrait mode, if you're zoomed in while in landscape orientation, it doesn't--that suggests this might be more of a bug than an intentional feature. Unfortunately, this trick also doesn't appear to function in any of the other apps in which I tried it. But hopefully it will at least simplify the process of trying to show grandma pictures of the kids at your next holiday gathering."
from Macworld.com
Free Photoshop?

Gimp is a program that will give you some of the same tools that Photoshop has, and best of all, it's free! It certainly won't replace Photoshop, but if you're looking for a free image editor that has the same look and feel as Photoshop, you should try it out.
Books for your computer or iPod

Look in my shared folder and you'll find a folder of books that have been converted to txt files. These are books that are available free all over the Internet collected in one folder. They'll work on your iPhone if you have a "reader" app.

Interested in Digital Filmmaking?

Check out this free class at the New Braunfels Public Library:
You have to be 16 and have access to a computer with video editing software--and guess what? You do! Learn the basics, and you can use your free time, or extra time before school, to use one of my Macs to do your editing.
Recorded Class Presentations

Have you missed a class or just need a review? Go to "Class Assignments" and scroll down to "Recorded Class Presentations." As we progress through the year, I'll be adding more and more videos to this section.
Tutorial for Devin
I know I'm a little late, but when I saw this today I thought you might be able to use it with your project.
http://www.photoshopstar.com/effects/recreate-indiana-jones-text-effect/
Moving Computers

Every once in a while, it will be necessary to move students to different computers. For the most part, the process is fairly easy: just drag your folders from your documents folder to your flash drive, and on the new computer, drag them back to the documents folder.
But, if you've already put a lot of work into your collections in Adobe Bridge, it would be a shame to lose all that. To keep that information, you have to copy and paste your collections "preferences" file.
To get to the preferences file, open a Finder window and go to
User (that's you) > library > Application support > Adobe > BridgeCS5 > Collections.
Drag the Collections folder onto your flash drive. Then, when you get to your new computer, repeat the process, pasting your full Collections folder on top of the empty folder of your new computer.
btw, your keywords should transfer without any extra work on your part. The keywords become part of the "metadata," which is stored in the image itself.
Shortcuts
On Tuesday (8/31) I reviewed the shortcuts you've learned so far, and you wrote them in your notebooks. For those of you who were absent, or who just want them in digital form, I've made a separate page on my blog to keep track of them. Look at the top of the blog page and you'll see a link called "shortcuts."
Hello, and Welcome Back!
The first day of school--wow! Welcome back.

If you missed the first day, here is what I covered:
1. Macs: If you are not accustomed to using Macs, don't worry. You will catch on fast! You are very, very lucky to have these Macs--the newest computers in the school, and the best computer for what we have planned for this year. Treat them well!
2. Rules:
a) No food or drinks in the classroom. You may have a water bottle if it has a screw-on lid.
b) Respect personal space, rights and property of others.
c) 10 minute rule: You may not leave the classroom during the first or last 10 minutes of class.
d) When you do leave the classroom, sign out and take the pass. When you come back, sign in and return the pass to its place.
e) Stay out of the wheeled chairs unless you are assigned to one.
f) Come to class on time, prepared with supplies and a great attitude!
3. Handout: Monday Mail and Supply List. Return the handout signed by a parent for your first homework grade.
4. Seat assignments
5. Individual introductions
Note: The 1st day handout is posted below.

Photos to Pencil Line Art
This would never have worked with the self portraits because of the amount of texture in portraits, but I thought it was an easy way to emulate the same type of image (at least the line art part) without all the work.
Fwd: RetouchPRO Tutorials
I stumbled across this tutorial and thought it was a great way to create folds in fabric.
Fwd: Painting Cloth and Hair in Photoshop - Tutorials - Mystical Modality
I love this technique because I love the smudge tool - one very underused tool in my opinion. I used this technique to smooth out fabric and create folds on a photo where the subject's white dress didn't flow correctly. But one day I'll experiment making these cool wings. :)
Subject: Painting Cloth and Hair in Photoshop - Tutorials - Mystical Modality
Fade tutorials
>
> Fading one image into another for an artistic effect:
> http://www.lunareclipse.net/basicfades.htm
>
> Gradually fading the background into a blur:
> http://www.creativepro.com/article/photoshop-how-to-lens-blur-with-alpha-channels
> Fading one image into another for an artistic effect:
> http://www.lunareclipse.net/basicfades.htm
>
> Gradually fading the background into a blur:
> http://www.creativepro.com/article/photoshop-how-to-lens-blur-with-alpha-channels
Fwd: photo resources
Finally, a list of decent sites that host free stock photos!
>
> http://www.digitalimagemagazine.com/blog/featured/25-free-stock-photo-sites/
>
>
> http://www.digitalimagemagazine.com/blog/featured/25-free-stock-photo-sites/
>
Mother's Day
Did you know Mothers Day is Sunday? What have you gotten for your mom,
or the person in your life who you consider a significant influence in
your life? If your answer is "um..." stay tuned for some inexpensive
gift ideas any mom would
Love to get!
or the person in your life who you consider a significant influence in
your life? If your answer is "um..." stay tuned for some inexpensive
gift ideas any mom would
Love to get!
Edited for update: Take one of your portraits (silhouette, self-portrait or typography portrait) and have it printed at Walgreens. Prices are very cheap--15 cents for a 4x6 or 1.50 for a 5x7. Sign it as the artist and give to Mom. Take it from a mom, she'll love it!
Individual Project
Begin forwarded message:
From: Linda Miller <lmiller@newbraunfels.txed.net>Date: May 3, 2010 8:46:45 AM CDTSubject: Individual ProjectIndividual Project
Grade Breakdown:
1. Proposal.
2. Progress. There will be 3 progress grades. These will be taken on a
"pop quiz" basis--in other words, you will never know when I am going to
take your progress grade, so if you are working on an outside assignment,
or you are playing games, you better hope I don't decide to take a
progress grade at that time.
3. Finished assignment. Counts as a test grade and a final exam grade,
so if you are exempting the final, that's great, but you still have to do
the final project.
Instructions:
You have had almost a full year of Web Page Mastery, in which you've
learned HTML (basic web pages), Dreamweaver (web page and web site
design), MovieMaker, Fireworks, Photoshop and Flash (and for some of you,
Gamemaker). We have covered many subjects and completed many different
projects. But...
Was there project that YOU wanted to do, that wasn't included? Here is
your chance to do it!
Steps for completing final project:
1. Decide what you want to do. Some examples:
Digital scrapbook
1 - 2 minute Flash animation
Series of animated gifs
Children's book illustrations
Design portfolio for favorite "whatever" (CD cover, web design, logo,
poster, animated gif, etc.)*
Party Package (invitation, thank you cards, table tent, poster, name tags,
decorations, T-shirt, etc.)*
Series of T-shirt designs or posters using artwork from tutorials
Series of portraits (i.e. individual family members, friends, etc.)*
Digital comic book
Web site (would include design and content)
15 - 20 minute slideshow/video* in Flash
Team picture package (softball team, club, etc.)*
*I have specific projects in this category that need to be done for other
classes or organizations. If you decide to use my project, you will
receive 10 points on your final project grade. If I use your project you
will receive 10 points on your final project grade AND your exam grade.
2. Write your Proposal
Your proposal is due by the end of class on Tuesday--yes, Tuesday, as in
May. 4th.
Must be typed.
Format:
Name and class period at the top.
One sentence summary of what you are going to do.
URL of example or instructions or tutorials.
Breakdown of steps you will take to complete the project, with an
estimated date of completion for each step.
How you will turn in your project--I want to know the file types, the name
of the folder you will be turning in, and how that folder will be
organized.
3. Work every day
Since this is a test grade, you may not ask me for help, unless it is to
clarify instructions. You may get help from others in the class, but
since this is an individual project, your best resource will be the web.
4. The final day you can turn this in is Monday, May 24th or Friday, May 22 if you are a senior. Plan to finish at least a day early. Use the extra day to make sure
everything is complete.
5. Organize files according to your proposal and turn in.
Good luck and have fun!
Linda Miller
Web Page Mastery
"Anyone who has lost track of time when using a computer knows the
propensity to dream, the urge to make dreams come true and the tendency to
miss lunch."
--Tim Berners
Red faced!
I have been working with photos for the Arc of the Hill Country site, and many of them have lighting issues. Some of the issues just can't be fixed--like a large light overhead casting a terrible glare. The problem with glares is that they create an absence of color and texture, so there's not really anything underneath to work with. The other problem has been a red tint to the skin of many of the subjects. I finally found this workaround, using a hue/saturation adjustment layer:
First, copy the layer (ctrl J), then...
1. Open a hue/sat adjustment layer, and select "reds."
2. Take the left eyedropper and click over the deepest red that needs to be fixed.
3. Next, take the eyedropper on the right ( - ), and click the skin tone you'd like to match.
2. Take the left eyedropper and click over the deepest red that needs to be fixed.
3. Next, take the eyedropper on the right ( - ), and click the skin tone you'd like to match.
4. Move the hue slider all the way to the left. The image will turn into magenta/blue one. Don´t worry.
**Now, look at the gray area between the two rainbow bars. There are two tiny tics within this area. Grab the tic on the right and move it to the left until only the area you want to fix has that magenta/blue stuff going on. It's okay if areas beyond the subject are selected--you will be erasing those later.
5. Move the hue slider to the right, beyond the original position until you reach your desired skin tone.
6. Now, merge the adjustment layer with the layer below.
7. Use your eraser, set with a hardness of about 50%, and erase the areas that you didn't want changed--for instance, someone's red shirt, or shoes, etc. Sometimes there will be nothing to erase...
8. Finally, merge down one more time, and you're done!
Congratulations!!!
Congratulations to the winners of the self portrait:
1st Place: Nicole H.
2nd Place: Samantha D.
3rd Place: Reagan I.
Also, congratulations to Shannon S., whose design was chosen for the Arc of the Hill Country website.
Great job everyone!
1st Place: Nicole H.
2nd Place: Samantha D.
3rd Place: Reagan I.
Also, congratulations to Shannon S., whose design was chosen for the Arc of the Hill Country website.
Great job everyone!


Enhancing Photos
I really love this photo of my son Mikey, but I hated the background (the original had power lines - I forgot to save a copy of the original [my bad])
Even after I removed the power lines, the sky is completely white, and the billboard is distracting. The image of Mikey also needs some sharpening and a blast of contrast.

The final version has
1 - a sky inserted into the background,
2 - the billboard removed, some of the trees replaced, (stamp tool)
3 - sharpening (Filter / Sharpening / Unsharp Mask)
4 - Auto Contrast (under the Image menu)
5 - This softening trick:
After merging all the layers, I copied that layer and applied a Gaussian blur of about 20 pixels, then changed the layer state to overlay. After that, just to take the saturation down a notch, I created a Hue/Saturation layer, and applied a Hue of +3 and lowered the Saturation to -3.
Here's the final version:
I also took out the other player. I haven't decided if I'm going to leave the sign in or not. What do you think? Reply with your opinion and get extra credit--but you have to tell my why I should or should not leave it in.
Soft Focus Lens
Give your photos the look of a soft focus lens:
http://www.photoshopessentials.com/photo-effects/soft-focus-lens/
http://www.photoshopessentials.com/photo-effects/soft-focus-lens/
14 Finalists for Arc!

The web committee for the Arc of the Hill Country has narrowed down their choices to sites created by the following 14 students:
Nicole H
Nicole H
Jeff M
Jonathan H
Sara Beth L
Cody S
Tyler R
James C
Ashley O
Troy H
Shannon S
Ana C
Carianne C
Kate R
Haylie N
Morgan WFrom Photoshop to t-shirt
Morgan created a great silhouette for her iPod assignment. In art class she used a portion of her image in her screen printing project. Well done Morgan! (wiping away a tear of pride...)


Morgan's Wonderland
I took this photo of one of the students at Morgan's Wonderland.
It was a good photo, but I wanted to make it a great photo.
It was a good photo, but I wanted to make it a great photo.

The first thing I did was brighten his teeth, then I used the liquify filter to tip the corners of his mouth into more of a smile. (Note: I will be changing this back to the original because I don't like the way it changes his overall facial features. Just because you can do something doesn't mean you should...)
I also used the healing tools to clear up some patchy areas.

Next I took out some of the background; the guy in the red shirt was also in the reflection, so I took that out as well. I used mostly the stamp tool for this.

Next I used the sharpen tool to create a brighter effect on the water.

Last, I added the reflection of the student.

typography portraits
Check out these links!
http://abduzeedo.com/photoshop-quick-tips-5-typographic-portrait
http://www.designflavr.com/Lyric-Cris-Wicks-i894/ (done with lyrics--
so cool!)
http://creativenerds.co.uk/inspiration/25-beautiful-examples-of-typography-portraits/
http://www.psdtop.com/blog/photo-effects/typographic-portrait-like-grammys-posters/
(something a little different)
http://espvisuals.blogspot.com/2009/05/steve-jobs-typographic-portrait.html
http://forum.gomedia.us/viewtopic.php?f=8&t=570
http://richbugger.wordpress.com/2009/10/04/how-to-create-a-potrait-typography/
Lonestardigital.com - Better Blue Sky (Photoshop Tutorial)
If you ever need to enhance the sky in an image, here is a great (and super easy) tutorial:
Put your design on a t-shirt!
There are websites out there that you can use to create your own t-shirt with your own design. Here is one example:
http://www.zazzle.com/igraffitti2_tshirt-235058536803082711
http://www.zazzle.com/igraffitti2_tshirt-235058536803082711
Arc logo
My wonderful students,
I spoke with the Arc's president of the board last night. She said
that they are locked into using the logo with the little people and
the swish, but that they can add to it--like adding something about
the hill country, or combining it with an image, or something that
would set them apart from the other Arc chapters.
Just an fyi before you get too far into designing a logo. Remember--
it would be better (deadline-wise) to design the site, and then design
the logo if you have time. That is especially true now that we know
that they have to use that logo.
btw, this is typical of what happens when you are designing for a
client. Often when you're right in the middle of your design, the
client comes up with a change (or two or three) that needs to be made.
:)
Mrs. Miller
iPod Silhouettes

I am so pleased with how your silhouettes are turning out!
If you would like your silhouette printed out on 11 x 17 paper, in color,
here is what you need to do:
1. Go to file > save as
and save your file as ipod_silhouette2
2. Delete all the layers that you don't have visible
3. Go to image > canvas size
and change the width to 11 inches and the height to 17 inches
(Note: if you have a horizontal image, you should change your canvas to
a width to 17 inches and the height to 11 inches)
4. Resize your silhouette and background to fit your new size.
5. Save
6. Save as your last name and as a pdf (file > save as > format >
Photoshop pdf)
7. Put your new file in the Athena > Web > print my silhouette folder
If you would like your silhouette posted on my website, here is what you
need to do:
1. Save your original ipod_silhouette file as a jpeg with your initials
as the file name.
2. Put your file in the Athena > Web > post my silhouette folder
Linda Miller
Web Page Mastery
"Anyone who has lost track of time when using a computer knows the
propensity to dream, the urge to make dreams come true and the tendency to
miss lunch."
--Tim Berners
iPod Silhouette Movie
My son Mikey is a fanatic about Pan from Dragonball Z. He calls her his "girlfriend" and his big dream is that one day she will become real and he can kiss her (remember--Mikey's autistic, but what he lacks socially and intellectually he more than makes up when it comes to imagination).
Anyhoo...
When he saw what we were working on he asked if he could have his picture taken "kissing Pan." So, to mash two potatoes with one fork (I'm trying to find an alternative to "kill two birds with one stone," a phrase which I find extremely cruel, especially to the birds) I adapted the iPod silhouette assignment to fit the bill.
Here is a video of me completing the assignment with the pen tool in Photoshop (turn your volume up):
Spare!
A few weeks ago Mikey participated in the Special Olympics State meet in Bowling. Here is a video of him making a spare--btw, he won a gold medal!
Website Gallery
As many of you know, I am no longer able to update my website from school, so I have to take my computer home and do it on the weekends. This has proven a problem lately because I've been so busy! But, I finally updated the Gallery and the links on the main page. The Gallery now has some of the hoax photos, and the main page links to the Videos and Files page.
Alaska
I use Photoshop all the time--from photography to scrapbooking to creating websites. Sometimes it's the only way to get a good photo from a bad one, and here is an example.
When I was in Alaska I took a bunch of pictures. Most of them came out with a blueish tint, because 1) in Alaska in the winter the light is always changing, and 2)I am not a good enough photographer to figure out which setting to use to overcome this .
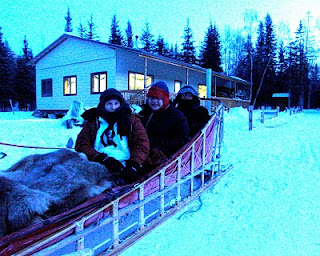
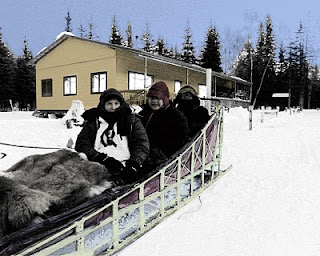
So here is a photo that the musher took of me, my son and my husband in the dog sled. With most of my photos I was able to add a filter and fix the blue tint, but with this one I have a blue tint and it was getting dark.
So here's what I had to do: take ALL the color out (turned it to black and white) and paint the color back in. I won't do this with all my photos, and I'm still not finished with this one, but I think it's worth the effort to have a special memento.
Before:
After:
Tribute by Sarah Beth
When I'm finished with this head cold (unless it finishes me first, lol) I'll embed it. Until then, here's the link:Better late than never, 'eh Sarah Beth? Good work, though. You've done a great job this six weeks!
Subscribe to:
Posts
(
Atom
)